Reader’s response always acts as a driving force for BikeAdvice’s authors. I am not an exception here, that’s why decided to write more for above mentioned title. (Link to Previous Article). As we know that the very first step for making bike everything is market research. Different companies adopt different research methodologies. Even single company also changes these research strategies according to vehicle type or segment. Mainly we can classify these research methods as Direct, Indirect, Quantitative and Qualitative. Again each classification has its own definition and sub-categorization. This classification is global, more to the point, not particularly for automotive market.

We are not aware about methods those adopted for market survey in automotive sector. At least, I have never seen any candidly performed detailed market researches for any vehicle in India. India already has become global market for automotive manufacturers because of which many companies are planning to establish manufacturing plants in India. As a result, we will also be the witnesses of detailed market researches in nearer future. As of today, I am not aware about market research methodologies adopted particularly for automotive market.
So I decided to omit this topic of “Market survey” and will switch over to next step in bike designing called “Sketching”. Particularly for bikes, there are very few parts and areas where designers can show their potential and which impacts on customer’s mind at first momentary look. This includes front fairing (if decided for bike), tank, tail fairing, headlights, side lights, tail lights, ORVMs and sometimes exhausts, seats and wheels. So designers are very vital components of this bike designing system. In simple words, we can say that the success of vehicle is totally depends on designers. Let’s start our journey through procedure of sketching a bike. Obviously, very first step do perform any thing is motivation.
1. Inspiration
Basic responsibility of designers is to create an attractive aesthetics for a vehicle. As said by someone “True inspiration comes from inside of us”, that’s why some designers do it by their own experience and thoughts while other needs some motivating reference. In the case of automotive design, the most inspirational reference is “Nature”. Designers take insects, reptiles, birds and animals as a reference. These references help designers to decide basic features and looks of vehicle.
Predominantly, insects and reptiles have big eyes. Shape and colours of eyes also differs amazingly amongst them. Vehicle’s headlights are also required to be large and with eye-catching shapes. That’s why insects and reptiles are mostly taken as a reference to design headlights and tail-lights. Bright skin colours also help designers to select appropriate combination for vehicle. Sometimes, animals are also taken as a reference to generate muscular looks of headlights and tail-lights. Below are the possible examples for use of insects and animals as a reference.

Above photo shows the headlight arrangement of Kawasaki ZX 14R. This arrangement resembles with eyes of spider.

Same state of designing we can observe here with tail-light of Yamaha FZ1. These tail-lights look like two big red eyes of praying mantis.

If we observe Suzuki B king’s headlight, the first picture comes in our mind is of male gorilla. I think, side and forehead fibre cowls of B king’s headlight are highly stimulated from face curves of gorilla.

Majority headlights, like Yamaha FZ1, look a lot like head shape of bull. This shape provides muscular and bulky looks at the front.

Almost all bikes come with incredible curves and edges. Basically, curves and edges are used to create visual pleasure and to define bold borders. Most of the curves are designed to provide brawny look along with the ergonomic considerations. Main inspirational references here are horse and bull. As shown in photo, both animals are muscular and also serves the purpose of visual impact on human mind.
It becomes easy for designers to decide aesthetics while designing DNA type vehicle. Majority of part are just converted in to small scale replica of the parental vehicle.
2. Pencil Lines
The next step is to convert the reference into good looking vehicle on paper. Designers use special types of pencils and charcoals (Nowadays computer screens and digital pens) to create drawing. These tools help designer to create sketches without much use of erasers. The sketch is always begun with simple shapes like line, circle, oval, triangle, square, etc. Image of vehicle got ready with the help of intersections of these basic shapes.

It’s really an enjoyment to watch any designer while designing any vehicle, especially strokes applied by him or her. I personally have observed one NID student performing automotive design. It was incredible experience.

Obviously there are so many lines in the very first sketch. It’s nearer to impossible for a common human to judge the final looks from first sketch if not highlighted. Designers prepare final sketch after deciding all the shapes from previous sketches. One final sketch is shown in below given snap.

3. Shading & Painting
Point we have discussed previously was about sketch and drawing. Majority people don’t know the difference between drawing and painting. Drawing gives idea about shape and size. While painting and shading gives idea about depth of peaks and valleys. That’s why next step in vehicle designing is shading on previously done sketch.

Above diagram shows the difference between drawing and painting. Square shown on left side gives idea about shape and size. It doesn’t give idea about any curve or steps provided on this square surface. Square on the right side gives idea about shape, size and roundness towards edges.
Above snap shows the significance of shading in automotive design. Each part is distinguished from its mating parts with the help of its depth, thickness and size. It also provides idea about flatness and curvatures.
4. Sketching Of Details
Next move is to prepare sketches for each and every part with the help of references. These details include headlight, tail-light, side lights, ORVMs, tank, fairings, tail fairings, cowls, front mud-guard, rear hugger, frame, grips, footrests, different covers on engine, seats, Speedo clusters, handle bar risers, fuel flap, wheels etc. One of the crucial parts is writing style, fonts and position of the name given to the vehicle.

Above diagram bears a resemblance to a headlight of much known machine. Do you have any guess? Still it is a line sketch than a complete design for a headlight.

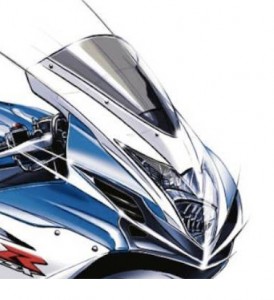
It is a front fairing design of Suzuki GSX R along with the design of headlight. This picture really converses the effect of shading and painting. The parts which are shining obviously have zeniths and sharp edges. On the reverse, the parts which are darkened have basins for aerodynamic flow and air intake. Particularly for headlight, each and every reflector is also considered for shading. This gives us idea about detailing and excellence required in designing.
5. Color Scheme
Subsequent move in vehicle designing is to decide colour schemes. Very first colour scheme is obviously selected from representative vehicle of the company. Numbers of sketches are prepared to illustrate the vehicle from different projections. Sometimes colour variations are also included with different prospective visualization if vehicle is decided to launch with multiple colour options.

Above snap illustrates a coloured sketch of Kawasaki ZX 14R. We all know this classic green is a representative colour of Ninja series so as used for sketching.

I am sure you all are capable to recognize above shown bike. Yes, it’s a KTM. This is nothing but the effect of colour scheme used here which is obviously a benchmark scheme of KTM. This rule is also applicable to all other vehicle. Particular colour scheme helps to pretend and retain vehicle’s image in customer’s mind very easily.
6. Computer Modelling
Don’t miss interpret this step by its name. It’s not at all an engineering modelling. It’s just a surface modelling of vehicle with the help of softwares like 3D-MAX (please correct me if I am wrong here) etc. This helps designers to reduce their efforts in preparing sketches with different projections. Computer model can be rotated in any direction to judge the appearance. Computer can also generate very small curves and edges very precisely.
Sketches with front view, right side view, left side view, rear view, top view and bottom view are imported in to the software. Surfaces are generated with respect to shading done in the sketches. Dark areas indicate valleys and shining areas indicate edges. Finally a 3-D model is prepared for a vehicle and can be used for clay / wax modelling.

Above diagram shows a surface designing for a dirt bike. It also illustrates grid used to generate surfaces. Grid separation shown here is very large, originally very small grids are used for modelling.

Above photo shows a complete surface model of a Suzuki GSR 750. This computer models also reduces designer’s effort to perform minor alteration according to manufacturing aspects.
Bikeadvice’s Advice
If you have capability to think a step ahead, if you have ability to convert your thoughts in to a sketch, if you have potential to imagine a future vehicle, then this is the most suitable field for your career. In India, we are having only one course related to this field called “Transportation & Automobile Design” offered at NID. You can visit official website of NID for more details.
This is all about second process adopted in vehicle designing. Sequence of above mentioned processes can be altered with different companies. I hope you all have enjoyed reading this post. Leave your valuable comments.
Disclaimer: Photographs and diagrams shown in this article are imaginary. They are given to support and to understand the article. Bikeadvice and author are not responsible for any resemble incidence.
Regards,
Dhruv Panchal
Source: Images taken from various sources for educational purposes under the Fair Use Policy.


